


OUR BLOG
![Custom-built roof rack made of strut [part 1]](https://images.squarespace-cdn.com/content/v1/67254a4d801eee466b8a2c68/1730497106815-STYW6TYSRUFLPD4QQ0Y2/rail.jpg)
Custom-built roof rack made of strut [part 1]
A few weeks ago I found an unbeatable deal on an awning through Napa Auto Parts of all places. The eight-foot awning by Maxi Trac was a steal at $99.99 + shipping. I quickly placed an order and waited for it to arrive. After it arrived I quickly learned that …
NOTE: This is my take on building a custom roof rack for a 2009 Chevrolet Suburban. This is by no means a complete list of step-by-step instructions. But a summary of what I did to complete the project. Links to parts, tools, and ideas from YouTube are included below. This build is not sponsored by any of the linked companies or brands. Items and tools used in the build were not donated by brands. I did purchase all of the items with my own money.
Installed passenger rail of a custom roof rack built with Superstrut on a 2009 Chevrolet Suburban. Click to enlarge. (Image: Brian Gailey)
A few weeks ago I found an unbeatable deal on an awning through Napa Auto Parts of all places. The eight-foot awning by Maxi Trac was a steal at $99.99 + shipping. I quickly placed an order and waited for it to arrive.
After it arrived I quickly learned that the factory roof rack was not going to work for mounting the awning. Sure, I could rig it but I also did not want to risk it flying off at 65 mph on the highway. So, I began researching a way to update the roof rack.
I first thought of buying an aftermarket kit. But after seeing the prices for roof racks and platforms I quickly tossed that idea out of the window.
Then I remembered watching Donald from Softroading the West mention he modified his roof rack on his Subaru Forester with Superstrut in a video from 2019 (Donald later uploaded a video about a Superstut roof rack on a Nissan Frontier). I then asked myself, “why can’t the entire rack be constructed from Superstrut material?” With no logical reason not to, I began measuring and collecting parts for the custom build.
Strut material is relatively inexpensive and assembles like an erector set. However, the assembly brackets and pieces can add up quickly if you are not careful. It can be as little as $20 for a ten-foot piece of strut but $7 for a right-angle bracket. The great part about this build is it can be as simple or as complex as you like. Overlapping strut pieces can help keep the cost down, but if you desire a sleeker look with more brackets the price can increase.
Disassembly
The old and tired factory roof rack was held on with a dozen T-25 star-patterned metric Torx bolts. Most of them came out easily enough. However, I found that the factory rivnuts were rather tired. Three spun loosely in the roof and another two had wollered out the holes so much that they were no longer attached to the roof at all. For this custom rack to work, I must remove and replace the factory rivnuts.
Luckily, I found a rivnut tool locally ($44.99, Harbor Freight) the tool even came with an assortment of rivenuts too.
I opted to go up one size on the bolts/rivnuts. This required drilling out the old rivnuts, drilling a slightly larger hole in the roof and replacing them with new rivnuts. I believe we went from 6mm to 8mm on the bolt diameter.
Now that the roof rack was off, and new rivnuts were installed, I added a small amount of silicone to each nut to reduce the risk of forming a leak.
Assembly
Disassembly of the old system was simple and straightforward. Assembling the new rack came with several choices. From the length of the runners the spacers used to mount them; paint finish to brackets & hardware. I decided to go with what worked best for me.
I knew I wanted to remount my eight-foot-long Yakima TopWater cargo box, add a storage basket, and install a larger solar panel. So I decided to keep the runners at the full length of ten feet. This also made making the math easy for the stringers that run across from rail to rail at approximately twenty inches.
Looking at the factory rack, there are molded plastic spacers clipped onto the rails to give it a bit of protection to the roof & paint from the rails. I wanted to do something similar to protect those areas in the custom build. I first tried using a rubber floor mat cut to shape. Unfortunately, the rubber proved to be too soft to tightly secure the rails to the roof. In some cases, when tightening the bolts on the rails, I pulled the rivnuts up into the rubber. Nearly pulling the new rivnuts right out of the roof.
Back to the drawing board on the spacer.
I used a lifeline and phoned a friend in the auto collision industry. Together we decided HDPE plastic would be the way to go on the spacer. This is not something normally stocked in a home improvement store. Amazon has a selection of sheets but I wanted to get my hands on it first before blindly ordering. Doing some research, HDPE plastics are often found in commercial applications as a protector against metal fatigue. Its also found in commercial kitchens as cutting boards.
Cutting boards!? That was a lightbulb moment.
I went down to a local restaurant supply store and sure enough, they had sheets of multiple-sized 1/2” thick HDPE cutting boards. One happened to measure 18”x12” perfect size for all the pieces I wanted (2”x12” spacers).
Bonus, the cutting board was about $15. Pieces on Amazon were much more expensive.
I used a circular saw with a blade made to cut plastics and simply ripped the large piece into the two-inch-wide pieces I needed.
Using a pencil and speed square, I marked out holes that lined up with the existing rivnuts on the roof. A drill and sharp bit made quick work on the holes.
TIP: Make sure to countersink the holes on the bottom of the spacers to account for the lip of the rivnut. This way they sit flush against the roof.
Now that the spacers were cut and the rivnuts were in. It was nearly time to mount the rails. But first, I wanted to coat the Superstrut in a black bedliner style material. I went with a rubberized material in hopes of durability and longevity. I picked up Duplicolor Truck Bed Liner ($15, local hardware store) scuffed the galvanized metal finish with an angle grinder fitted with a flap disc, and sprayed away. The bed liner went on easily enough and appears to be holding up, but only time will tell.
Looking back, I believe, I would have been just as happy with flat black spray paint for one-third of the price.
Mounting the rails
The roof of the 2009 Chevrolet Suburban is curved from driver to passenger and slightly from front to back; the strut is straight. This posed a slight bit of a problem. The curve from driver to passenger causes the strut (rails) to angle outwards slightly at the top. [We will deal with this when installing the stringers in part 2.] The curve from the front to back causes the strut to not sit flush on the roof. Fortunately, the plastic spacers along with the newly installed rivnuts and a super hot sunny day helped with this problem.
Direct exposure from the hot summer sun helped by heated the stut, expanding the metal a little, and adding a bit of flexibility to the rail. With the strut sufficiently heated, I began bolting it on; starting in the back and working my way forward. Each sinched bolt brought the front end of the strut closer and closer to the roofline.
TIP: Be sure to add a small dab of removable thread locker to the rail bolts to reduce the risk of them working loose.
I simply repeated this install procedure to the opposite rail and both were installed easily.
More on the build coming in part 2
This makes the end of part 1. In part 2 of the custom roof rack build, we cut, paint, and install the cross members. We assemble the rack using Superstrut hardware. And I will show you how to use spring nuts to best work for you.

‘Camperburban’ Platform Build
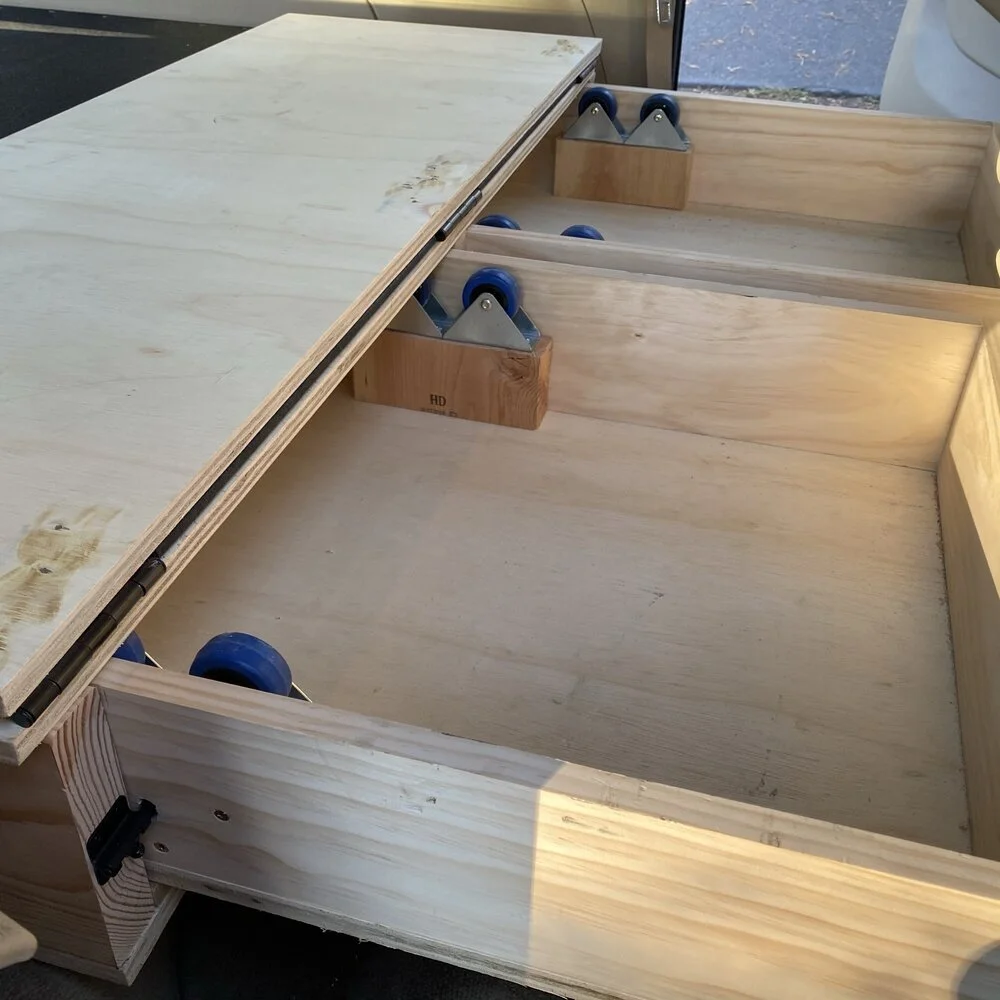
The platform is the base of the entire interior “camperburban” build. I kept the construction very simple it is basically a box with two drawers sitting on ball bearings. All the building materials I sourced from Home Depot, Harbor Freight, a local hardware store - Diamond Home Improvement, and a few items off Amazon.
DISCLAIMER - This is not a how-to build of the platform but rather an explanation of what I did that worked for me personally. Please feel free to use this as inspiration for your own build.
The platform is the base of the entire interior “camperburban” build. I kept the construction very simple it is basically a box with two drawers sitting on ball bearings. All the building materials I sourced from Home Depot, Harbor Freight, a local hardware store - Diamond Home Improvement, and a few items off Amazon.

Image caption
For the wood I used:
3/4 inch sanded birch plywood for the top and bottom of the box and bottom of the drawers
2x8 inch construction grade Douglas Fir beams as the vertical supports
1x2 inch strapping I had leftover from another project
1x6 inch select grade pine for the drawer sides
For hardware, the kit is extra basic
1 1/2 inch wood decking screws
36 inches of 2 inch by 1/8 inch thick metal plate. This was bent into an “s” shape and used to bolt the front of the box to the rear seat mounts
Two stainless steel turnbuckles (Amazon) to secure the structure
Two stainless steel 8mm ring bolts (Amazon) to mount the turnbuckles
Two lag screw hooks to mount the turnbuckles
1-inch roller bearings & 2-inch casters from Harbor Freight as makeshift drawer slides
Two 2-inch D-ring loops for strapping the cooler
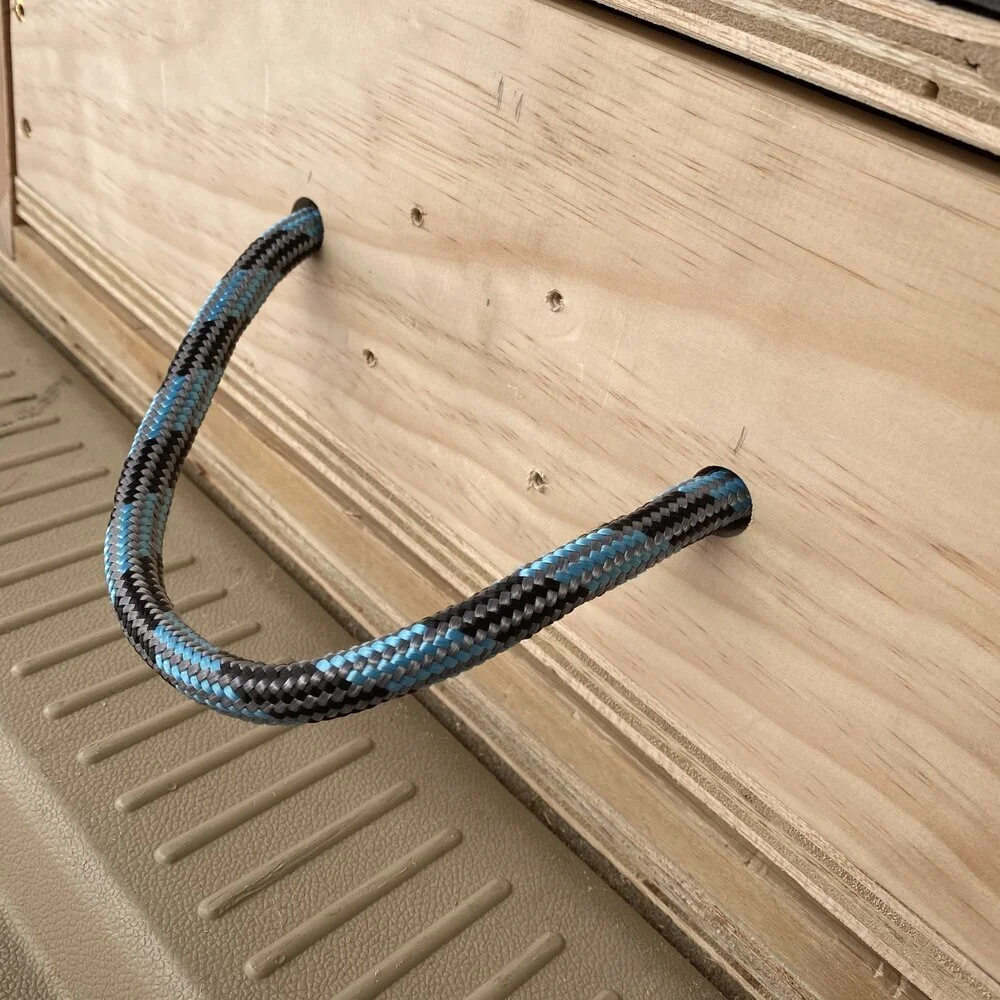
Gate handles - I opted to swap these out for simple rope loops for handles. The gate handles worked great but was loud as they shimmied when Jack was in motion.
Door hinges for the extension flap
Barrell bolt latches for locking the drawers closed
14 feet of 24-inch wide rubber mat
8 cans of Rust-Oleum flat black spray paint
2 cans of Rust-Oleum satin clear coat
Looking at this I am sure you have questions, let me see if I might be able to answer a few.
Why did you not use drawer slides?
I chose not to use traditional drawer slides as I wanted the drawers to slide through the platform. Slide back out the tailgate and forward into the cab. It is the forward slide that the 24-inch flap-folds onto to support the full-length mattress.
Do you have plans or blueprints for the build?
No, I do not have a set of plans for this build, nor do I have step-by-step instructions on how to construct the platform. What I do have is a large number of photos from the construction of the project. Feel free to browse through the photos for inspiration for your own build.
What mattress do you use?
I first purchased a full-sized 8-inch cooling gel mattress off Amazon on Prime Day. This mattress was extremely comfortable but it was just too tall. There was not much headroom left when laying on the mattress. I ended up selling that privately and ordering a full-sized 4-inch tri-fold memory foam mattress instead. I have not yet (as of the time of writing this) slept on this mattress yet. However, it fits the vehicle much better and provides an extra 4-inches of clearance versus the previous mattress.
If you have any other questions not answered above feel free to ask in the comments below or check the FAQ you might find what you need there too.


The Birth of Jack
Several years ago, my wife and I decided that our end goal was to live out of a vehicle and travel throughout the United States, Canada, and Mexico. We had no idea what we wanted to live out of - a van, motorhome, or travel trailer. What we did know is that we wanted a 4x4 for off-pavement capabilities and we wanted to experience more of Mother Nature than just what is along the interstates and highways crisscrossing the continent.
Several years ago, my wife and I decided that our end goal was to live out of a vehicle and travel throughout the United States, Canada, and Mexico. We had no idea what we wanted to live out of - a van, motorhome, or travel trailer. What we did know is that we wanted a 4x4 for off-pavement capabilities and we wanted to experience more of Mother Nature than just what is along the interstates and highways crisscrossing the continent.
After searching for months we could not find what we wanted. Then like a light bulb it clicked, a Chevrolet Suburban.
Jack takes in the sunset in Southern Oregon. (Image: Brian Gailey)
Sure a Suburban is not what one might first think of for recreational travel but think about it, they are a solid 4x4 with a dependable drive train that has been in production for decades. They are roomy inside for a comfy bed and can still seat up to 4 people. I can do the build myself, that way I know how to fix it when it breaks. We can have water, a kitchen, and electricity integrated into the build. A Suburban can be lifted, upsized to bigger tires, and includes anything I want it to have. I can make the build as posh or basic as I like. Plus, the biggest in my mind, they are an affordable platform to start a build on.
Dealer photo (Image: Autolane)
So I began searching for a Surbaban that met the needs I wanted. What I did not know was how long it would take to find it. I searched for months and had a laundry list of things that I wanted in the truck. Unfortunately, what I wanted just was not readily available in the used market and what I did find would sell quickly or was in poor condition.
What I did find in my initial search was inspiration from the crew at Suboverland.com with their custom overland builds for Suburbans. When I found these guys, I knew I was on the right path and I wanted to order one immediately. But their conversions were out of my beginning budget.
Inspired I began to search even broader - I was looking in Phoenix, Denver, Dallas, and St. Louis. But still, no luck and I began to get frustrated.
LIKE / FOLLOW / SUB

STICKER MERCH
JACKS BUILD
Curious as to what gear we have in Jack? Check out our rig details page.